Making an blog site using ASP.NET MVC
- Thanh Dinh
- Web development
- May 27, 2024
Table of Contents
Strategy divide the video into each sections Listen super super carefully & Take Note for each section.
- ! bug maybe cause if I missheard or misunderstood any part.
- note: Using Bot to rate my documentation and refine it after I finished.
- ! If there a Bug remember these things:
- Check if it a Real Bug. Or because I think it a Bug
- Eliminate distraction. Delete side function and focus on what causing the bug. (if there’re 1 bug in 1 large function then delete all other function and focus just on the bug if neccesary)
- If it a Technical but that I can search -> Search. If it a personal bug, pray to myself and try my best.
What we’ll Learn & Achieve
- CRUD Operations
- CRUD (Create, Read, Update and Delete)
- Seed Initial Data
- Routing: datas to the DB
- Repository Pattern
- Form Submission: get data on page load and how to submit form.
- Notifications
- Bootstrap CSS Framework
- UI/UX: Consistent, Clean and Responsive
- Create a Web API Controllers on an MVC application
- then invoke API using JS
- Use asynchronous throught out the course
- Use 3rd party Text Editor to create content for our blog application
- Authentication & Authorization using Microsoft Identity
- Register
- Login
- Role Based Authorization
- Multiple Roles (User, Admin,
- SuperAdmin)
- Manage Users
- Features included: tag, manage blog (CRUD on blog) and user (CRUD on user)
Blog WebApp Project Overview
Project Setup
- New Project:
- Open Visual Studio and click “Create a new project”.
- Search for “ASP.NET Core Web App (Model-View-Controller)” and click Next.
- Name your project (e.g., “MyBlogApp”) and choose a suitable location. Click Next.
- Select an appropriate .NET version (check video for recommended version). Choose “Individual User Accounts” for authentication if you want a user login system. Click “Create”
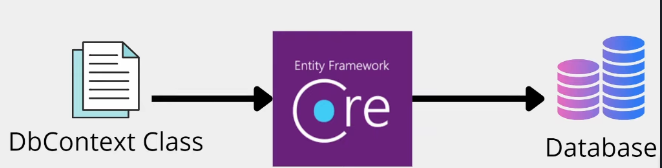
Database Setup (Entity Framework)
- Data Models:
- Create a
Modelsfolder in your project. - Add classes to represent your data:
Post.cs: (id, title, body, dateCreated, …etc.)Tag.cs: (id, name, displayName)
- Create a
- Database Context:
- Create a new class (e.g.,
BlogDbContext.cs) in yourModelsfolder (or a separateDatafolder) - Make it inherit from
DbContext. - Add
DbSetproperties for each model:public DbSet<Post> Posts { get; set; } public DbSet<Tag> Tags { get; set; }
- Create a new class (e.g.,
Connect to Database:
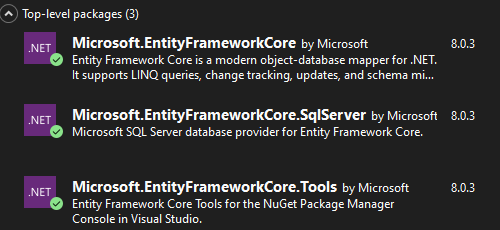
- Install
Microsoft.EntityFrameworkCore.SqlServerNuGet package. - Add your database connection string in
appsettings.json. - In
Startup.cs, in theConfigureServicesmethod, add:services.AddDbContext<BlogDbContext>(options => options.UseSqlServer(Configuration.GetConnectionString("MyBlogApp")));
- Install
Create Migrations:
- Open Package Manager Console (Tools -> NuGet Package Manager -> Package Manager Console)
- Run
Add-Migration InitialCreate - Run
Update-Database
Controllers
Posts Controller:
- Right-click the
Controllersfolder -> Add -> Controller -> MVC Controller with views, using Entity Framework - Select
Postas your model class,BlogDbContextas your data context class. Name itPostsController.
- Right-click the
Tag Controller:
- Repeat step 6 for your
Tagmodel, naming itTagsController.
- Repeat step 6 for your
Views
Modify Layout:
- Edit
_Layout.cshtml(inViews/Shared) to add navigation links for your blog, admin area, etc.
- Edit
Implement Views:
- The scaffolding should have created basic views under
Views/PostsandViews/Tags. Customize these for listing posts, creating new posts, editing, deleting, adding/managing tags, etc.
- The scaffolding should have created basic views under
Additional Features (Refer to the video for more specifics)
- User Authentication/Authorization: If you chose “Individual User Accounts” during setup, you’ll have a basic login/registration system.
- Rich Text Editor: Consider integrating a rich-text editor (like TinyMCE or similar) for post creation.
- Tag Management: Implement tag assignment to posts from your admin area.
Testing and Deployment
- Thorough Testing: Test as you build each feature.
- Deployment: Choose a hosting provider suitable for ASP.NET Core applications (Azure, AWS, or others).
Project Document
Model
DB

Blog post (m - m) Tag
Create a Folder Domain which store 2 Entity Models
BlogPost
public class BlogPost
{
	public Guid Id { get; set; }
	public string Heading { get; set; }
	public string PageTitle { get; set; }
	public string Content { get; set; }
	public string ShortDescription { get; set; }
	public string FeatureImageIRL { get; set; }
	public string UrlHandle { get; set; }
	public DateTime PublishedDate { get; set; }
	public string Author { get; set; }
	public bool Visible { get; set; }

	// create many-to-many relationship between Blogpost table and Tag table
	public ICollection<Tag> Tags { get; set; }
}
Tag
public class Tag
{
  public Guid Id { get; set; }
  public string Name { get; set; }
  public string DisplayName { get; set; }

	// create many-to-many relationship between Tag table and Blogpost table
  public ICollection<BlogPost> BlogPosts { get; set; }
}
-> Create M-M relationship ? at the end mean Nullable property
public string? Heading {get; set}
Installing Entity Framwork Packages
Creating DbContext Class
Performing CRUD operations on our database tables using Entity Framework Core
Create Data folder to store DbContext (Database Context)

// BloggieDbContext Inherit from DbContext
public class BloggieDbContext : DbContext
{
  // Overwrite DbContextOptions with BloggieDbContext
  public BloggieDbContext(DbContextOptions<BloggieDbContext> options) : base(options)
  {

  }

  // BlogPost as DbSet
  public DbSet<BlogPost> BlogPosts { get; set; }
  public DbSet<Tag> Tags { get; set; }
}
Add ConnectionString into appsetting.json
{
  "Logging": {
    "LogLevel": {
      "Default": "Information",
      "Microsoft.AspNetCore": "Warning"
    }
  },
  "AllowedHosts": "*"
  // our connection string
  "ConnectionStrings": {
    "BloggieDbConnectionString": "Data Source=macbookM5\\SQLEXPRESS;Initial Catalog=BloggieDb;Integrated Security=True;Connect Timeout=30;Encrypt=True;Trust Server Certificate=True;Application Intent=ReadWrite;Multi Subnet Failover=False"
  }
}
Inject DbContext Into Our App
using dependency connection so our application will smartly handle all the connections and instances -> provided data smoothly.
Inject DbConext to tell Program.cs knowing what database it using.
// Inject DbConext => (telling which server we're using)
builder.Services.AddDbContext<BloggieDbContext>(options =>
    // paste connection string name inside GetConnectionString()
    options.UseSqlServer(builder.Configuration.GetConnectionString("BloggieDbConnectionString")));
EF Core Migrations
Run this command on Package Manager Console

Add-Migration "Initial Migration"
Create tables using the Data set "DbSet<Models_name> DbSet_Name {get;set}" from the DbContext file

Update
	Update all the table and column from Migration Folder to the Database (in the connection string)
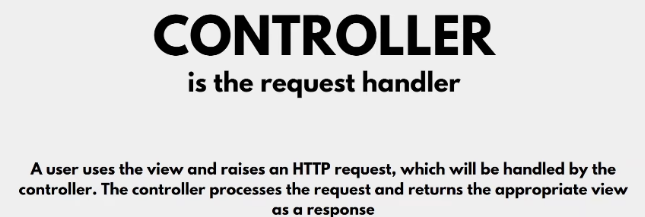
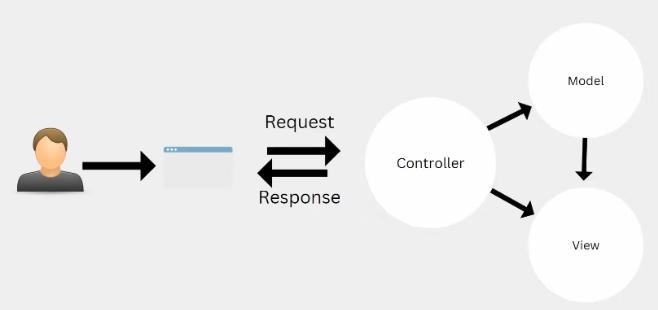
Introduction to MVC: Model View Controllers

MODEL (represent the data)
A class in C# is used to describe a model. Model objects store data
retrieved from the database
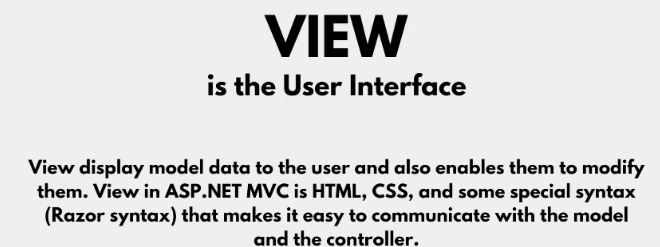
HTML, CSS, JS and a little of C# for Razor syntax
Tags Controller
Admin Functionality To Add A Tag
The Folder from View reflect the controller from Controllers folder

TAG DROPDOWN: Connect link to a Tag
using asap.
- asp- controller=“AdminTags” -> connect to the controller
- asp-action=“Add” -> Action of that controller
<li class="nav-item dropdown">
	 <a class="nav-link dropdown-toggle text-light" href="#" role="button" data-bs-toggle="dropdown" aria-expanded="false">
		  Admin
	 </a>
	 <ul class="dropdown-menu">
		  <li><a class="dropdown-item"
				asp-area=""
				asp-controller="AdminTags"
				asp-action="Add">Add Tag</a>
			</li>
	 </ul>
</li>
Submit Forms and Data Binding
Read Incomming Request using Model Binding use asp-for=""
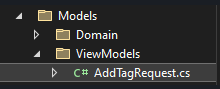
- Create a View Model name “AddTagRequest.cs” in ViewModels folder
Create Tag to get data from HTML
public class AddTagRequest
{
  public string Name { get; set; }
  public string DisplayName { get; set; }
}
- Make a HTML page name “Add” and get input data using View Model’s tags
Connet the ViewModel to the HTML file
@model MyBlog.Web.Models.ViewModels.AddTagRequest
Get input data using View Model’s tags
<div class="mb-3">
	<label class="form-label">Name</label>
	<input type="text" class="form-control" value="" id="name" asp-for="Name"/>
</div>

<div class="mb-3">
	<label class="form-label">Display Name</label>
	<input type="text" class="form-control" value="" id="displayName" asp-for="DisplayName"/>
</div>
- Get Data from Web to the Database (BloggieDbContext) Create Action Add to View Add.cshtml page
[HttpGet]
public IActionResult Add()
{
	return View();
}
- Use Action HttpsPost to Create/Update datas
- Create new Tag to store input datas
// POST: /AdminTags/Add
[HttpPost]
[ActionName("Add")] // if they're not the same Cs still recognized which Add to use (context: compare Add above and Add below)

public IActionResult Add(AddTagRequest addTagRequest)
{
	// Mapping AddTagRequest to Tag
	var tag = new Tag
	{
		 Name = addTagRequest.Name,
		 DisplayName = addTagRequest.DisplayName,
	};
- Add Tag (input datas) to bloggieDbContext
	 // get data from tag
	bloggieDbContext.Tags.Add(tag);
	// crucial to save changes
	bloggieDbContext.SaveChanges();

	return View("Add");
}
the code above Saving Data to Database
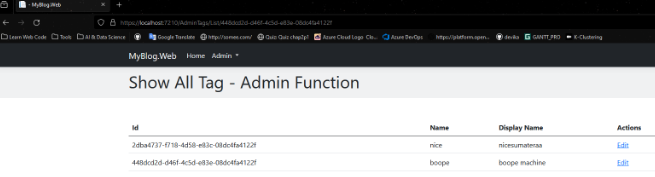
Read Records From Database
- ! Remember: Http command are like execute SQL query in 1 Word. Connect ‘Tag Model’ to .cshtml and get it List of data
@model List<MyBlog.Web.Models.Domain.Tag>
Create Table, Extract data from Model with Razor (syntax)
List of ‘Tag Model’ represent as ‘Model’ so we represent each tag using @foreach and extract it data.
<!-- Store and View the List -->
<div class="container py-5">
    <!-- Get Table Datas existed a Model -->
    @if (Model != null && Model.Any())
    {
        <!--Boostrap table -->
        <table class= "table">

            <thead>
                <tr>
                    <th>Id</th>
                    <th>Name</th>
                    <th>Display Name</th>
                    <th>Actions</th>
                </tr>
            </thead>

            <tbody>
                <!-- Take the attributes of each Tag Object -->
                @foreach (var tag in Model)
                {
                    <tr>
                        <td>@tag.Id</td>
                        <td>@tag.Name</td>
                        <td>@tag.DisplayName</td>
                    </tr>
                }
            </tbody>
        </table>
    }
    else
    {
        <p>No tags found ! </p>
    }
</div>
in AdminTagController we want to use HttpGet for Displaying Purpose. Get Tags table from bloggieDBContext and extract it into a List name tags and return it.
// DISPLAY Functionality
[HttpGet]
// use to redirect user to the List view
[ActionName("List")]
public IActionResult List()
{
	// get data from bloggieDbContext
	var tags = bloggieDbContext.Tags.ToList();

	// return data to view
	return View(tags);
}
Update (Edit) Records From Database
We need to Update a Record from the Db. The simpliest solution is to replace user input with the data from the DB. To do that we will have to:
- Create a Edit Page (Display current Data from bloggieDbContext)
- Create a Model (get Edited User Input)
- Replace old with new. (bloggieDbContext data -> editTagRequest data)
- ! Displaying Chosen Record Data
First we Create an HTML Page & Connect bloggieDbContext to Displau chosen Record
<!-- Binding View to EditTagRequest Model -->
@model MyBlog.Web.Models.ViewModels.EditTagRequest
@{

}

<div class="bg-secondary bg-opacity-10 py-2">
    <div class="container">
        <!-- Keep Functionality Different for each Page-->
        <h1 class="display-4">Edit Function - Admin Functionality</h1>
    </div>
</div>
Display data & Update Btn
<div class="container py-5">
    <form method="post">
        <!-- Id -->
        <div class="mb-3">
            <label class="form-label">Id</label>
            <!-- asp-for Good send data to the Model and View the Data comming back from the DB ->
              <!-- readonly to prevent user from changing the value -->
            <input type="text" id="id" class="form-control" asp-for="Id" readonly/>
        </div>

        <!-- Name -->
        <div class="mb-3">
            <label class="form-label">Name (Use dashline between words like Potato-Peel)</label>
            <input type="text" id="id" class="form-control" asp-for="Name"/>
        </div>

        <!-- Display Name -->
        <div class="mb-3">
            <label class="form-label">Display Name</label>
            <input type="text" id="id" class="form-control" asp-for="DisplayName"/>
        </div>


        <!-- Update & Delete-->
        <div class="mb-3">
            <div class="d-flex">
                <button type="submit" class="btn btn-dark">Update</button>
            </div>

        </div>

    </form>
</div>
Add Edit option for each each Record and Display data from the Db using Controller’s Action
<!-- Take the attributes of each Tag Object -->
@foreach (var tag in Model)
{
  <tr>
		<td>@tag.Id</td>
		<td>@tag.Name</td>
		<td>@tag.DisplayName</td>

		<!-- Edit Record with Id -->
		<td>
			 <a asp-area=""
			 asp-controller="AdminTags"
			 asp-action="Edit"
			 asp-route-id="@tag.Id">Edit</a>
		</td>
  </tr>
}
- ! We want to save chosen Data to EditTagRequest Model so we can replace data from Db with it later
namespace MyBlog.Web.Models.ViewModels
{
    public class EditTagRequest
    {
        // Create new bc we want to seperate Edit Tag from the List Tag
        // Saving Edit Model data then transfer it to List Model
        public Guid Id { get; set; }
        public string Name { get; set; }
        public string DisplayName { get; set; }
    }
}
- ! Get Record attributes with its Id.
- Get Record id using ‘Guid Id’ -> allow to use chosen id as Path Let get the Tags from bloggieDbContext with our chosen id to save it in a Variable (tag).
- using ‘FirstOrDefault’ to Scan each Record and Chose the first id that match with our chosen id.
- Save extracted data to a list and return it (to Edit.cshtml)
[HttpGet]
// Action Name is crucial bc it show What .cshtml file to render
[ActionName("Edit")]
// read Tag by id
public IActionResult Edit(Guid id)
{
	// 1st method
	//var tag = bloggieDbContext.Tags.Find(id);

	// 2nd  method
	// Find tag by id and return the 1st one it found
	var tag = bloggieDbContext.Tags.FirstOrDefault(x => x.Id == id);

	// Return EditTagRequest Model to the view if tag is not null
	if (tag != null)
	{
		 var editTagRequest = new EditTagRequest
		 {
			  Id = tag.Id,
			  Name = tag.Name,
			  DisplayName = tag.DisplayName
		 };

		 return View(editTagRequest);
	}

	return View(null);
}
To Concluded, Display Db chosen Record data by conencting Db to the HTML pages and transfer record's data through [HttpGet] Edit Action
- ! Now Let Edit the Chosen Record’s Data
- Get Data from ‘EditTagRequest Model’ as tag
- Connect and Get Data from bloggieDbContext as existingTag
- Replace desired data from existingTag with tag
- Return to List Page to see the result
[HttpPost]
// Action Name is crucial bc it show What .cshtml file to render
[ActionName("Edit")]
// notice: Tag.id != existingTag.id bc Tag.id is from EditTagRequest and existingTag.id is from bloggieDbContext
// Edit - replace the existing tag with new tag data, then save changes
public IActionResult Edit(EditTagRequest editTagRequest)
{
	// tag object - get tag from editTagRequest (data from Edit.cshtml)
	var tag = new Tag
	{
		 Id = editTagRequest.Id,
		 Name = editTagRequest.Name,
		 DisplayName = editTagRequest.DisplayName,
	};

	// existingTag object - get existing tag from bloggieDbContext (Data from Database)
	var existingTag = bloggieDbContext.Tags.Find(tag.Id);

	// replace existing tag with new tag datas
	if (existingTag != null)
	{
		 existingTag.Name = tag.Name;
		 existingTag.DisplayName = tag.DisplayName;

		 // save changes
		 bloggieDbContext.SaveChanges();

		 // show success notification
		 TempData["SuccessMessage"] = "Tag updated successfully!";

		 return RedirectToAction("List", new { id = editTagRequest.Id });
	}

	// show fail notification
	return RedirectToAction("List", new { id = editTagRequest.Id });
}
return to List Page with Edited Record Id to show success edited.
return RedirectToAction("List", new { id = editTagRequest.Id });
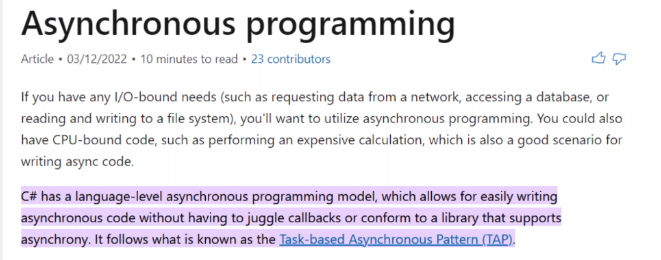
Asynchronous Programming and Repository Pattern
Asynchronous Programming
- ? Async Make WebApp go Vrooooooooooooommmmmmmmmmmmmmmmmmmmmmmmmmmmmmmmmmmmmmm
Repository Pattern
Act as a middle man. Reference example:
- Like in Math. You save all your fomular into a Notebook (responsitory). So each time you encounter an problem that require the same fomula to solve, you could bring all that juicy fomula from the Notebook (responsitory) out and solve the problem.
- Like in Code: act like a Library that responsible for talking to the Db.
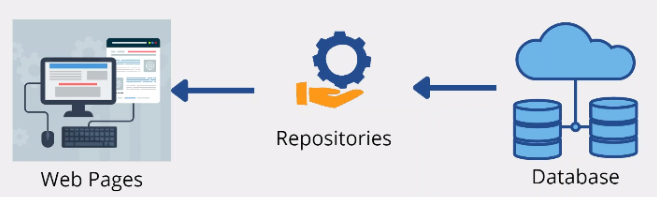
Advantage:
- If u need to do any changes, you only need to do it in only 1 place
- The Job talking to the Db is all within the responsitory -> very Clean & Tight. better than having
s*x
Problem & Process of making Repositories
- ! Problem: we have to rewrite code that talk to the Db repeatedly -> Want to group all those code together into a file and called it like a function.
- $ Solution: Making a Responsitory which include all the code responsible for talking to the Db.
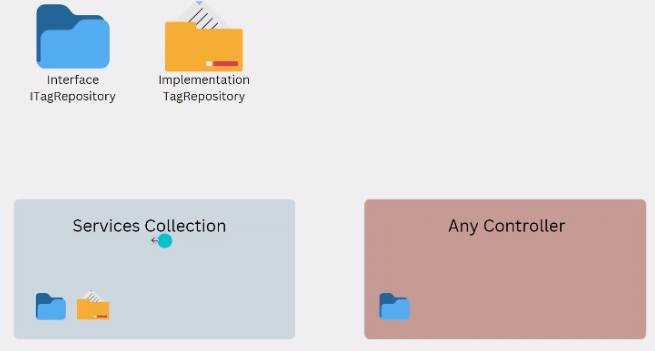
- ? How this Process work:
- Make a Interface to hold the function name and definition. (hold unique function)
- Make a Responsitory to inherit the Interface function (allow implement interface’s function as many time as we want)
- Replace those duplicated code from the Controller with Reponsity function we just make.
- Replace those duplicated code from the Controller with Reponsity function we just make.
For example, instead of repeating 2 lines
await bloggieDbContext.Tags.AddAsync(tag);
await bloggieDbContext.SaveChangesAsync();
We just need to call AddAsync(tag).
public async Task<Tag> AddAsync(Tag tag)
{
    // Want to talk to the Db
    await bloggieDbContext.Tags.AddAsync(tag);
    await bloggieDbContext.SaveChangesAsync();

    return tag;
}
[HttpPost]
public async Task<IActionResult> AddTag(AddTagRequest addTagRequest)
{
	var tag = new Tag
	{
		 Name = addTagRequest.Name,
		 DisplayName = addTagRequest.DisplayName,
	};

	await tagResponsitory.AddAsync(tag);
	return View("Add");
}
That the core concept. “Document Later Down in here”
Implement CRUD Operation
Overview
Controller (
AdminBlogPostsController)Add (HttpGet)Action:- Fetches all tags from the database.
- Creates an
AddBlogPostRequestmodel and populates theTagsproperty for display in the view. - Renders the
Addview, passing the model.
View (
Add.cshtml)- Presents an HTML form to collect blog post information.
- Includes a dropdown (
<select>) to allow selecting a single tag, populated by theTagsprovided by the model.
Form Submission (
Add (HttpPost)Action)- When the form is submitted, the selected tag and other blog post data is included in the
AddBlogPostsRequestobject and sent to the controller. - Currently, the
Add (HttpPost)action just redirects back to the form (you’d implement adding the blog post to the database here).
- When the form is submitted, the selected tag and other blog post data is included in the
Visual Summary
Create Page to Post Blog (AdminBlogPosts Controller with Add View)
- AdminBlogPosts Controller
- Add Page
- AddBlogPostsRequest Model -> Hold Blog’s input data
Inside Add Page -> hold all user’s input data + Allow user to choose Multiple Tags + Allow to choose a tag + Allow to choose multiple tag (save each selected tag to a list)
- Create the Controller for Add page
// Add tags to View
[HttpGet]
public async Task<IActionResult> Add()
{
	return View();
}
- Create Add View (.cshtml Page)
<div class="bg-secondary bg-opacity-10 py-2">
    <div class="container">
        <h1 class="display-4">Admin Function</h1>
    </div>
</div>
- Create BlogPostRequest Model to store data in and out of the Db
- Include all BlogPost attributes beside Id and list of Tags from Tag Table
- SelectedTag use to get selected Tags so we can add it to a Tag List for BlogPost
public class AddBlogPostsRequest
{
  public string Heading { get; set; }
  public string PageTitle { get; set; }
  public string Content { get; set; }
  public string ShortDescription { get; set; }
  public string FeatureImageIRL { get; set; }
  public string UrlHandle { get; set; }
  public DateTime PublishedDate { get; set; }
  public string Author { get; set; }
  public bool Visible { get; set; }

  // Display Tags. Allow to Display tag in a Drop Down List
  public IEnumerable<SelectListItem> Tags { get; set; }
  // Collect Tags. Allow to Collect Tags from the Drop Down List
  public string SelectedTag { get; set; }
}
- Connect to the Model and Display Model’s data
- Display tag: Get List Item of Tag from Tags Attribute in AddBlogPostsRequest Model.
@model MyBlog.Web.Models.ViewModels.AddBlogPostsRequest;
@{ }

<div class="bg-secondary bg-opacity-10 py-2">
    <div class="container">
        <h1 class="display-4">Admin Function</h1>
    </div>
</div>

<div class="container py-5">
    <form method="post">
        <div class="mb-3">
            <label class="form-label">
                Heading
            </label>
            <input type="text" class="form-control" id="heading" asp-for="Heading"/>
        </div>

        <div class="mb-3">
            <label class="form-label">
                Page Title
            </label>
            <input type="text" class="form-control" id="pageTitle" asp-for="PageTitle"/>
        </div>

        <div class="mb-3">
            <label class="form-label">
                Content
            </label>
            <textarea class="form-control" id="content" asp-for="Content"> </textarea>
        </div>

        <div class="mb-3">
            <label class="form-label">
                Short Description
            </label>
            <input type="text" class="form-control" id="shortDescription" asp-for="ShortDescription" />
        </div>

        <div class="mb-3">
            <label class="form-label">
                FeatureImageIRL
            </label>
            <input type="text" class="form-control" id="featureImageIRL" asp-for="FeatureImageIRL" />
        </div>

        <div class="mb-3">
            <label class="form-label">
                URL Handle
            </label>
            <input type="text" class="form-control" id="urlHandle" asp-for="UrlHandle" />
        </div>

        <div class="mb-3">
            <label class="form-label">
                Published Date
            </label>
            <input type="date" class="form-control" id="publishedDate" asp-for="PublishedDate" />
        </div>

        <div class="mb-3">
            <label class="form-label">
                Author
            </label>
            <input type="text" class="form-control" id="author" asp-for="Author" />
        </div>

        <div class="form-check mb-3">
            <input class="form-check-input" type="checkbox" id="visible" asp-for="Visible">
            <label class="form-check-label">
                Is Visible ?
            </label>
        </div>

        <!-- Display Tags -->
        <div class="mb-3">
            <label class="form-label">Tags</label>
            <!-- Dropdown -->
            <select class="form-select"
            asp-items="@Model.Tags"
            asp-for="SelectedTag"></select>
        </div>

        <div class="mb-3">
            <button type="submit" class="btn btn-dark">
                Save
            </button>
        </div>
    </form>
</div>
Controller
- ? Talk to the Db using responsitory (give ’talk to Db’ function )
private readonly ITagResponsitory tagResponsitory;

public AdminBlogPostsController(ITagResponsitory tagResponsitory)
{
	this.tagResponsitory = tagResponsitory;
}
- ? Select all Tag from tagResponsitory and Save it to Tags List Item in AddBlogPostsRequest Model
// Add tags to View
[HttpGet]
public async Task<IActionResult> Add()
{
// get tags from Db using function in repository
var tags = await tagResponsitory.GetAllAsync();

var model = new AddBlogPostsRequest
{
	 // Select from Tag Domain Model to Tags in AddBlogPostsRequest Model
	 Tags = tags.Select(x => new SelectListItem { Text = x.Name, Value = x.Id.ToString() })
};

	// return Tags (list item of tag) to Add View
	return View(model);
`}
- ? Bc we use post method form. So we must use [HttpPost] to call Add Action.
// addBlogPostsRequest store input from Add View
[HttpPost]
public async Task<IActionResult> Add(AddBlogPostsRequest addBlogPostsRequest)
{
	// redirect to Add action above
	return RedirectToAction("Add");
}
Closer Look
After Tags List Item have been filled using tagResponsitory in the Controller. It will be display here.
<!-- Display Tags -->
<div class="mb-3">
	<label class="form-label">Tags</label>
	<select class="form-select"
	asp-items="@Model.Tags"
	asp-for="SelectedTag"></select>
</div>
Saving BlogPost Entity With Tags To The Database
Create a Responsitory system the same as Tag. Use to save BlogPost datas to the DB.
- Create BlogPostResponsitory Interface
public interface IBlogPostRepository
{
  Task<IEnumerable<BlogPost>> GetAllAsync();
  Task<BlogPost> GetAsync(Guid id);
  Task<BlogPost> AddAsync(BlogPost blogPost);
  Task<BlogPost> UpdateAsync(BlogPost blogPost);
  Task<BlogPost> DeleteAsync(Guid id);
}
- Create BlogPostRepository using IBlogPostRepository interface
public class BlogPostRepository : IBlogPostRepository
{
	private readonly BloggieDbContext bloggieDbContext;

	// get all data from bloggieDbContext
	public BlogPostRepository(BloggieDbContext bloggieDbContext)
	{
	  this.bloggieDbContext = bloggieDbContext;
	}

	public async Task<BlogPost> AddAsync(BlogPost blogPost)
	{
	  // Take blogPost Object and add to BlogPosts table in Db
	  await bloggieDbContext.BlogPosts.AddAsync(blogPost);
	  // remember to Save changes
	  await bloggieDbContext.SaveChangesAsync();

	  return blogPost;
	}

	public async Task<BlogPost> DeleteAsync(Guid id)
	{
	  throw new NotImplementedException();
	}
}
- Get both Repositorys: Tag and Blog for Add Page
public class AdminBlogPostsController : Controller
{
  private readonly ITagRepository tagRepository;
  private readonly IBlogPostRepository blogPostRepository;

  public AdminBlogPostsController(
		ITagRepository tagRepository,
		IBlogPostRepository blogPostRepository)
  {
		this.tagRepository = tagRepository;
		this.blogPostRepository = blogPostRepository;

  }
- Save Add View inputs to BlogPost
// addBlogPostsRequest store input from Add View
[HttpPost]
public async Task<IActionResult> Add(AddBlogPostsRequest addBlogPostsRequest)
{
	// Map View Model to Domain Model
	// ? Get input from Add View and store in BlogPost
	var blog = new BlogPost
	{
		 Heading = addBlogPostsRequest.Heading,
		 PageTitle = addBlogPostsRequest.PageTitle,
		 Content = addBlogPostsRequest.Content,
		 ShortDescription = addBlogPostsRequest.ShortDescription,
		 FeatureImageIRL = addBlogPostsRequest.FeatureImageIRL,
		 UrlHandle = addBlogPostsRequest.UrlHandle,
		 PublishedDate = addBlogPostsRequest.PublishedDate,
		 Author = addBlogPostsRequest.Author,
		 Visible = addBlogPostsRequest.Visible,
	};
- For Tags selection. Get exisingTag object by selected tag’s id and Add it to selectedTags List. Finally Add the selectedTags List to Domain Model Tags (BlogPost Tags List Item)
// Map Tags from selected tags
// ? Get selected tags from Add View and store in selectedTags
var selectedTags = new List<Tag>();
// Keep looping untill all selected tags are selected
foreach (var selectedTagId in addBlogPostsRequest.SelectedTags)
{

	 var selectedTagIdAsGuid = Guid.Parse(selectedTagId);
	 var existingTag = await tagRepository.GetByIdAsync(selectedTagIdAsGuid);

	 // Add existingTag tags to selectedTags List
	 if (existingTag != null)
	 {
		  selectedTags.Add(existingTag);
	 }

}

// Mapping tags back to domain model
// Save selectedTags to BlogPost Tags List Item attributes
blog.Tags = selectedTags;
- Add blog Model to the Db and return to Add View
// Add BlogPost to Db
await blogPostRepository.AddAsync(blog);

// Redirect to Add View
return RedirectToAction("Add");
**Guid Id vs Id**

**Guid Id**
- **Type:** Globally Unique Identifier. It is typically a 128-bit (16-byte) hexadecimal value.
- **Appearance:** Looks like this: `e53b45fa-04df-4008-a144-345b4a443b7c`
- **Generation:** Usually generated randomly or algorithmically.

**Id**
- **Type:** Often a simple auto-incrementing integer (`int` in most programming languages).
- **Appearance:** Looks like this: `1`, `2`, `3`, etc.
- **Generation:** Typically auto-generated by the database system when a new record is inserted.
<td>
	@foreach (var tag in blogPost.Tags)
	{
		<span class="badge badge-primary m-2">@tag.DisplayName</span>
	}
</td>
Introduction WYSIWIG and Image Upload
WYSIWIG - what you see is what you get

Call API to store image to 3rd hosting party

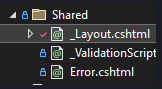
Go into Shared folder Insert to the Head of the
_Layout.cshtmlfile
- ? Locally Links: not work yet
<link href="../Froala/css/froala_editor.pkgd.css" rel="stylesheet" type="text/css"/>
<script type="text/javascript" src="../Froala/js/froala_editor.pkgd.min.js"></script>
Or
- ? Remotely Link: Work perfectly (remember to replace @lastestversion with the real version like
froala=editor@4.0.10)
<link href='https://cdn.jsdelivr.net/npm/froala-editor@4.0.10/css/froala_editor.pkgd.min.css' rel='stylesheet' type='text/css' /><script type='text/javascript' src='https://cdn.jsdelivr.net/npm/froala-editor@4.0.10/js/froala_editor.pkgd.min.js'></script>
- ? Call tag by Id to use Froala
@section Scripts {
    <script>
        var editor = new FroalaEditor('#content');
    </script>
}
Image Upload
Create a API. Upload Image from the Editor.
Create a RestAPI. Call API to our page. Use Upload func to Ipload

Use Cloudinary to Host Image Online
using CloudinaryDotNet;

Account account = new Account(
  "ddvgrzrie",
  "333314161181714",
  "0QyFH10nw-Xy9y9oEWx2kATMAG0");

Cloudinary cloudinary = new Cloudinary(account);
Image Upload (using API)
- ! Utimate Goal: Automatically the process of Uploading & Retrieving image URL (using GET and POST method for API)
- ? (POST) Upload Image pushed to Cloudinary API -> Image URL Send back to the Db
- ? (GET) Automatically save image ULR to FeatureImageUrl (as text)
In this part we will GET (retrieve) image from the API and POST (upload) image to Cloudinary

To perform this operation
Create POST Method and Image Repository
- ? In this part, we want to Connect to Cloudinary and test POST method
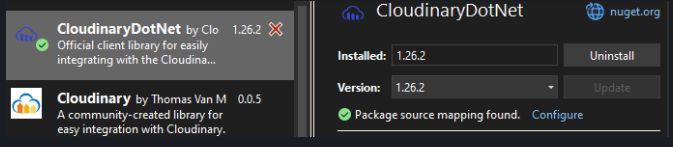
Download Cloudinary to NuGet Package
Follow clean code architecture, we create an Interface for CloudinaryImageRepository
public interface IImageRepository
{
  // get and return the Image Url to the Cloud
  Task<string> UploadAsync(IFormFile file);
}
- Before we connect Cloudinary we would need to setting ours account in appsettings.json for verifying purposed
- go to appsetting.json
// Cloudinary settings
"Cloudinary": {
  "CloudName": "ddvgrzrie",
  "ApiKey": "333314161181714",
  "ApiSecret": "0QyFH10nw-Xy9y9oEWx2kATMAG0"
}
and Inject dependency in Program.cs file. So that CloudinaryImageRepository can talk to the Db
// handle dependency injection
builder.Services.AddScoped<IImageRepository, CloudinaryImageRepository>();
- Now we can Configure ours Cloudinary Account and Connection. To verify ours API Account and Connection purpose
using CloudinaryDotNet;
using CloudinaryDotNet.Actions;


namespace MyBlog.Web.Repository
{
	public class CloudinaryImageRepository : IImageRepository
	{
	  private readonly IConfiguration configuration;
	  private readonly Account account;

	  // config connection to Cloudinary
	  public CloudinaryImageRepository(IConfiguration configuration)
	  {
			this.configuration = configuration;
			account = new Account(
				 configuration["Cloudinary:CloudName"],
				 configuration["Cloudinary:ApiKey"],
				 configuration["Cloudinary:ApiSecret"]);
	  }
	}
- This is where we Upload the image file (from the parameter). Upload it to Cloudinary and return it Url
- Use client as a ‘account setting’ holder
- Store Image data to uploadParamas
- File (hold file Name as file Description and Open file)
- Display file Name
- Upload the image File to client (which will be save in ours Cloudinary API Library)
- Check if uploadResult is Null or not. If not then return the image connection URL
// Upload Image to Cloudinary and return the Image URL
public async Task<string> UploadAsync(IFormFile file)
{
	var client = new Cloudinary(account);

	// uploadParams - image name and file
	var uploadParams = new ImageUploadParams()
	{
		 File = new FileDescription(file.FileName, file.OpenReadStream()),
		 DisplayName = file.FileName,
	};

	var uploadResult = await client.UploadAsync(uploadParams);

	// return imageURL (uploadResult) as string after successfully Uploaded
	if (uploadResult != null && uploadResult.StatusCode == System.Net.HttpStatusCode.OK)
	{
		 return uploadResult.SecureUri.ToString();
	}
	else
	{
		 return null;
	}
}
- Finally, from ImagesController we call imageRepository Upload function to Upload Image file and get Image URL in return.
- ! Yes, this part can be consider WebAPI
[Route("api/[controller]")]
[ApiController]
public class ImagesController : ControllerBase
{
  // allow the ImageRepository to be used in the ImagesController
  private readonly IImageRepository imageRepository;

  // constructor for the ImageController
  public ImagesController(IImageRepository imageRepository)
  {
		this.imageRepository = imageRepository;
  }

  [HttpPost]
  public async Task<IActionResult> UploadAsync(IFormFile file)
  {
		// call imageRepository to upload the image
		var imageURL = await imageRepository.UploadAsync(file);

		// return error msg if null and reutrn the image URL if true
		if (imageURL == null)
		{
			 return Problem("Something went wrong", null, (int) HttpStatusCode.InternalServerError);
		}

		return new JsonResult(new { link = imageURL});
  }
  // use a Post command to post it to a Image Hosting Service
}
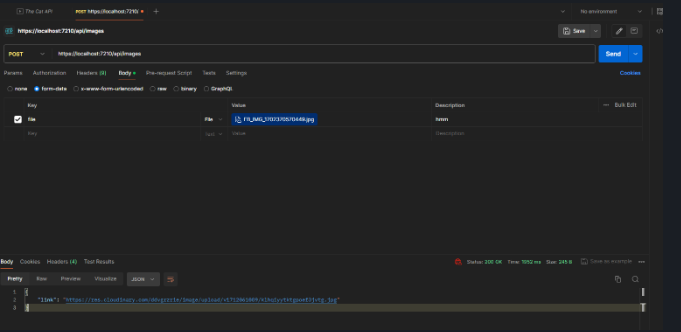
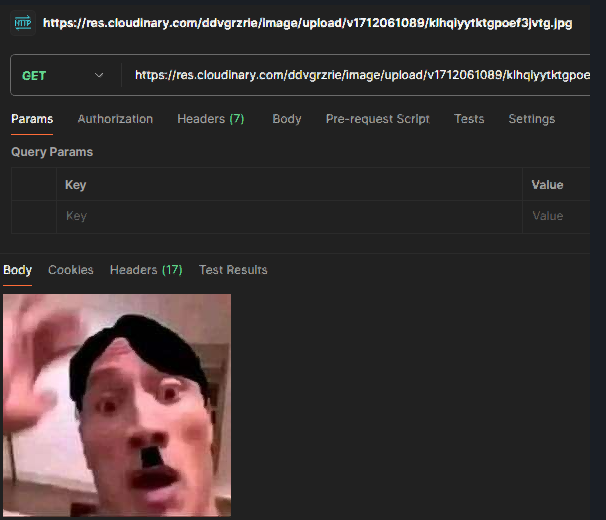
- Testing if everything worked with POSTMAN Test result:
Image Uploaded to Cloudinary Library
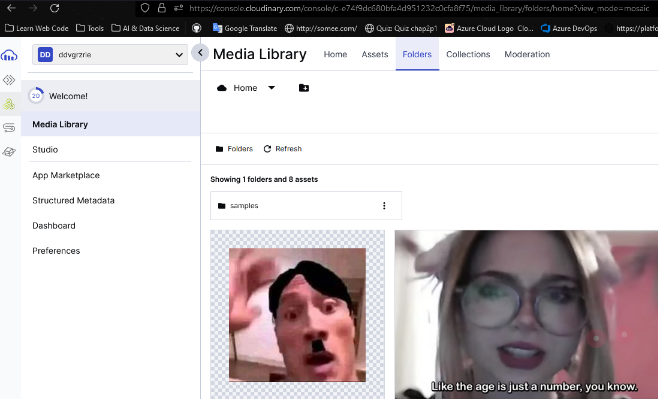
Image Url return
Use Get Method to check if the image Url is working -> Image return
Upload and Display Image
As we previously successfully test POST method. In this part we will implement it into ours Blog for Upload and Display.
- Create a HTML div to Upload and Display Image.
<div class="mb-3">
	 <!-- Upload Image -->
	 <label class="form-label">Featured Image Upload</label>
	 <input type="file" id="featuredImageUpload" class="form-control" />
	 <!-- set style to none so img would be invisible before it have the image Url form the API-->
	 <img src="" id="featuredImageDisplay" style="display:none; width="300px;" />
</div>
- Now we Write a Script to fetch data Image and use POST method to upload it to Cloudinary API Library. Then return its Url and Display it in FeaturedImageDisplay
 Scripts Summary:
 FE: Uploaded Image Url save to Featured Image Url input
 BE: fetch our API endpoint 'api/images' and Upload it to CLoudinary API Library using POST method

 1) To automate the Upload and POST image process we first get the featuredUploadElement element
	 and featuredImageUrlElement to store images Url
 2) Then use EventListener to activte 'uploadFeaturedImage' function if
	 listen to any changes in featuredUploadElement
 3) uploadFeaturedImage will responsible for
	  + Get upload image info
	  + talking to the API to upload the image
			+ save image data as 'file' type
			+ fetch ours API endpoint '/api/images' and use POST method
	  + Send back the result to console to check if successed
@section Scripts {
    <script>
        // use Froala TextEditor format for #content element
        var editor = new FroalaEditor('#content');
        // get input image data in featuredUploadElement
        const featuredUploadElement = document.getElementById('featuredImageUpload');
        // save image Url in featuredImageUrlElement
        const featuredImageUrlElement = document.getElementById('featuredImageURL');
        // Display image with Url in featuredImageUrlElement
        const featuredImageDisplayElement = document.getElementById('featuredImageDisplay');

        // e - represent changes event triggered by the file input
        async function uploadFeaturedImage(e) {
            console.log(e.target.files[0]);

            // Save image data type file to data
            let data = new FormData();
            data.append('file', e.target.files[0]);

            // fetch API end point '/api/images' then upload image using POST method (like we did in Postman)
            await fetch('/api/images', {
                method: 'POST',
                headers: {
                    'Accept': '*/*',
                },
                body: data
                // listen to response and get result
            }).then(response => response.json())
                .then(result => {
                    // save Image link to featuredImageUrlElement
                    featuredImageUrlElement.value = result.link;
                    if (featuredImageUrlElement.value != null) {
                        // attach img Url from the API to featuredImageDisplayElement
                        featuredImageDisplayElement.src = featuredImageUrlElement.value;
                        // change Display style to Block to make it appear
                        featuredImageDisplayElement.style.display = "block";
                    }
                    console.log(result);
                });
        }

		 // Display Image if featuredImageUrlElement existed
        if (featuredImageUrlElement.value != null) {
            // attach img Url from the API to featuredImageDisplayElement
            featuredImageDisplayElement.src = featuredImageUrlElement.value;
            // change Display style to Block to make it appear
            featuredImageDisplayElement.style.display = "block";
        }
        else{
            featuredImageDisplayElement.style.display = "none";
        }

        // When the value of the input changes (i.e., the user selects a file)
        // The uploadFeaturedImage function is automatically executed.
        featuredUploadElement.addEventListener('change', uploadFeaturedImage);
    </script>
}
Display Image in WYSIWYG
Tell Froala to use CloudinaryImageController
Display BlogPost and Tag
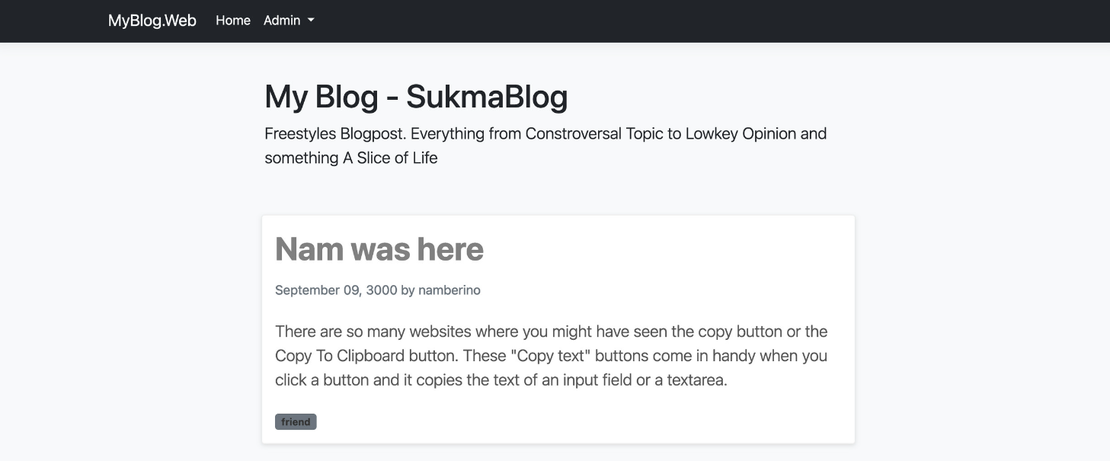
1 Seeding some Blogs to the Db Home page -> show all the Blog in the app Routing to show all detail of the BlogPost Then we add tags as a Catafories
     <div class="row align-items-center g-5 py-5">
         <!-- Blog Name and Title -->
         <div class="col-12 col-lg-6">
             <h1 action="display-5 fw-bold lh-1 mb-3">My Blog - SukmaBlog</h1>
             <p class="lead">
                 Freestyles Blogpost - Everything from Constroversal Topic
                 to Lowkey Opinion and something A Slice of Life
             </p>
         </div>
         <div class="col-12 col-lg-6"></div>
     </div>
BlogPost Model
public Guid Id {* *get; set; }
public string Heading { get; set; }
public string PageTitle { get; set; }
public string Content { get; set; }
public string ShortDescription { get; set; }
public string FeaturedImageUrl { get; set; }
public string UrlHandle { get; set; }
public DateTime PublishedDate { get; set; }
public string Author { get; set; }
public bool Visible { get; set; }

// Navigation Property
public ICollection<Tag> Tags { get; set; }
BlogPost Design Concept
<!-- BlogPosts Container -->
<div class="container">
    <div class="row justify-content-center">
        <div class="col-lg-8">
            @if (Model != null && Model.Any())
            {
                foreach (var blogPost in Model)
                {
                    <article class="blog-post mb-5 card">
                        <div class="card-body">
                            <header class="blog-post-header">
                                <h1 class="blog-post-title display-6 mb-4">@blogPost.Heading</h1>
                                <div class="blog-post-meta text-muted d-flex justify-content-between">
                                    <span>@blogPost.PublishedDate.ToString("MMMM dd, yyyy")</span>
                                    <span>@blogPost.Author</span>
                                </div>
                            </header>


                            <div class="blog-post-content mt-4">
                                <p class="lead">@blogPost.ShortDescription</p>
                                <a href="/blog/@blogPost.UrlHandle" class="btn btn-primary">Read More</a>
                            </div>

                            <footer class="blog-post-footer mt-4">
                                @if (blogPost.Tags != null && blogPost.Tags.Any())
                                {
                                    <div class="blog-post-tags">
                                        @foreach (var tag in blogPost.Tags)
                                        {
                                            <a href="/blog/tag/@tag.Name" class="badge bg-secondary text-decoration-none">@tag.Name</a>
                                        }
                                    </div>
                                }
                            </footer>
                        </div>
                    </article>
                }
            }
        </div>
    </div>
</div>
Key Parts of Your BlogPost Design
- BlogPosts Container: This is the overarching structural element that holds all of your blog post listings.
<div class="container">
  <div class="row justify-content-center">
    <div class="col-lg-8">
      </div>
  </div>
</div>
- Blog Article: Each individual blog post is represented by this section.
<div class="blog-post-image">
  <img src="@blogPost.FeaturedImageUrl" alt="@blogPost.Heading" class="img-fluid" />
</div>
- Blog Post Header: Contains the title, date, and author information.
<header class="blog-post-header">
    <h1 class="blog-post-title display-6 mb-4">@blogPost.Heading</h1>
    <div class="blog-post-meta text-muted d-flex justify-content-between">
        <span>@blogPost.PublishedDate.ToString("MMMM dd, yyyy")</span>
        <span>@blogPost.Author</span>
    </div>
</header>
- Blog Post Image (Example): This is where you’d display a featured image.
<div class="blog-post-image">
    <img src="@blogPost.FeaturedImageUrl" alt="@blogPost.Heading" class="img-fluid" />
</div>
- Blog Post Content, Description, Read More (Example): Includes short description and the ‘Read More’ button.
<div class="blog-post-content mt-4">
    <p class="lead">@blogPost.ShortDescription</p>
    <a href="/blog/@blogPost.UrlHandle" class="btn btn-primary">Read More</a>
</div>
How to Integrate Here’s how you could integrate these new examples into your existing code structure:
<article class="blog-post mb-5 card">
    <div class="card-body">
     <header class="blog-post-header">
       </header>

     <div class="blog-post-image">
         <img src="@blogPost.FeaturedImageUrl" alt="@blogPost.Heading" class="img-fluid" />
     </div>

     <div class="blog-post-content mt-4">
       <p class="lead">@blogPost.ShortDescription</p>
       <a href="/blog/@blogPost.UrlHandle" class="btn btn-primary">Read More</a>
     </div>
</article>
Publish WebMVC (Db include)
Link youtube turtorial : how to connect BlogwebMVC
Authentication and Authorization (using Microsoft.AspNetCore.Identity)
Identity library give all funcs for Authen and Autho
- Create Roles and give superAdmin all roles permission Create AuthDbModel using IdentityDbContext library
Select AuthDbContext Db to avoid conflict with BloggieDbContext and bc more than 2 DbContext
public class AuthDbContext : IdentityDbContext
{
  public AuthDbContext(DbContextOptions<AuthDbContext> options) : base(options) {}
Next, Create Roles and Add it to Identity Role
protected override void OnModelCreating(ModelBuilder builder)
{
    base.OnModelCreating(builder);

    // Seed Roles (User, Admin, SuperAdmin)
    var adminRoleId = "73a13894-0991-4aa4-81fa-cc7bd36fe248";
    var superAdminRoleId = "42d0062d-ff45-4aec-beb8-5f68fc8195a8";
    var userRoleId = "4499da9c-da78-4aa5-84f4-449857beeb33";

    var roles = new List<IdentityRole>
    {
        new IdentityRole
        {
            Name="Admin",
            NormalizedName="Admin",
            Id = adminRoleId,
            ConcurrencyStamp = adminRoleId,
        },

        new IdentityRole
        {
            Name="superAdmin",
            NormalizedName="superAdmin",
            Id = superAdminRoleId,
            ConcurrencyStamp = superAdminRoleId,
        },

        new IdentityRole
        {
            Name="User",
            NormalizedName="User",
            Id = userRoleId,
            ConcurrencyStamp = userRoleId,
        }

    };
    builder.Entity<IdentityRole>().HasData(roles);
Finally, create and add all roles to SuperAdmin User
        var superAdminId = "c3675926-f9cf-4afe-9bb9-343750eb1680";
        // Seed SuperAdmin User
        var superAdminUser = new IdentityUser
        {
            UserName = "superadmin@myblog.com",
            Email = "superadmin@myblog.com".ToUpper(),
            NormalizedUserName = "superadmin@myblog.com".ToUpper(),
            Id = superAdminId,
        };

        superAdminUser.PasswordHash = new PasswordHasher<IdentityUser>()
            .HashPassword(superAdminUser, "sukurmom");

        builder.Entity<IdentityUser>().HasData(superAdminUser);

        // Add all roles to SuperAdmin User (Admin, SuperAdmin, User)
        // IdentityUserRole need a Key of type <string>
        var superAdminRoles = new List<IdentityUserRole<string>>
        {
            new IdentityUserRole<string>
            {
                RoleId = adminRoleId,
                UserId = superAdminId,
            },

            new IdentityUserRole<string>
            {
                RoleId = superAdminRoleId,
                UserId = superAdminId,
            },

            new IdentityUserRole<string>
            {
                RoleId = userRoleId,
                UserId = superAdminId,
            },
        };

        builder.Entity<IdentityUserRole<string>>().HasData(superAdminRoles);
    }
}
- Setup AuthDb Connection, Identity Framwork and Migration.
Create a new Connection connect to a new unexist Table for Migration and to ensure security Ex:
"BloggieAuthDbConnectionString": "Data Source=macbookM5\\SQLEXPRESS;Initial Catalog=BloggieAuthDb;Integrated Security=True;Connect Timeout=30;Encrypt=True;Trust Server Certificate=True;Application Intent=ReadWrite;Multi Subnet Failover=False"
Get AuthDb Connection string and applied Identity Framework to my Program
// Authentication DbContext
builder.Services.AddDbContext<AuthDbContext>(options =>
    options.UseSqlServer(builder.Configuration.GetConnectionString("BloggieAuthDbConnectionString")));

builder.Services.AddIdentity<IdentityUser, IdentityRole>()
    .AddEntityFrameworkStores<AuthDbContext>();
Set up Sign In password requirement
builder.Services.Configure<IdentityOptions>(options =>
{
    // Default settings password requirements
    options.Password.RequireDigit = true;
    options.Password.RequireLowercase = true;
    options.Password.RequireNonAlphanumeric = true;
    options.Password.RequireUppercase = true;
    options.Password.RequiredLength = 6; // at least 6 chars
    options.Password.RequiredUniqueChars = 1;
});
Then Call Authy and Autho functions
// Allow to use Authentication
app.UseAuthentication();
app.UseAuthorization();
Authentication -> able to use certain of features or not
Setting finished, Let Migration using Add-Migrate and Update-Database command.
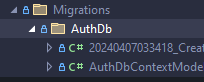
! Add name and -Context when Add-Migrate and Update-Database AuthDbContext is the ContextDb Name
Update-Database -Context “AuthDbContext” (result img below)
If not using -Context this is the error

! The DbContext Migrate data must be Correct from Update-Database to happened. If DbContext was fix in any period of time. Re-Update the Database
! Both Entity Framework 6 and Entity Framework Core are installed. The Entity Framework 6 tools are running. Use ‘EntityFrameworkCore\Add-Migration’ for Entity Framework Core.
EntityFrameworkCore\Add-Migration "Name" -Context "DbContext_Name"
EntityFrameworkCore\Update-Database -Context "DbContextName"
- Create Sign Up and Login, Logout button in the header.
<div class="d-flex align-item-center">
  <!-- Check User signed In or Not -->
  @if (signInManager.IsSignedIn(User))
  {
		// Display the User Name if Logged In
		<div class="btn me-3 text-light">
			 @User?.Identity?.Name
		</div>

		<a class="btn me-3 text-light"
			asp-area=""
			asp-controller="Account"
			asp-action="Logout">
			Logout
		</a>
  }
  else
  {
		<a class="btn me-3 bg-light text-dark"
			 asp-area=""
			 asp-controller="Account"
			 asp-action="Register">
			 Register
		</a>

		<a class="btn me-3 text-light"
			 asp-area=""
			 asp-controller="Account"
			 asp-action="Login">
			 Login
		</a>
  }
</div>
- In the Controller we will now need Action for Sign In, Login and Logout
- We will use [HttpGet] method to redirect.
- Sign In and Login -> its Own View (page) and Redirect back to Home when run successful
- Logout -> Home View
First we, Use
 public class AccountController : Controller
 {
		private readonly UserManager<IdentityUser> userManager;
		private readonly SignInManager<IdentityUser> signInManager;

		public AccountController(UserManager<IdentityUser> userManager,
			SignInManager<IdentityUser> signInManager)
		{
			this.userManager = userManager;
			this.signInManager = signInManager;
		}
Secondly, we create AccountController.cs and create Sign In, Log In page along with it
	  [HttpGet]
	  public IActionResult Register()
	  {
			return View();
	  }

	  // Create Post method for Register
	  [HttpPost]
	  public async Task<IActionResult> Register(RegisterViewModel registerViewModel)
	  {
			var identityUser = new IdentityUser
			{
				 UserName = registerViewModel.UserName,
				 Email = registerViewModel.Email,
			};

			// store the password. for privacy reasons
			// CreateAsync come from IdentityUser
			var identityResult = await userManager.CreateAsync(identityUser, registerViewModel.Password);
			if (identityResult.Succeeded)
			{
				 // Assign this user the "User" role (newly created user)
				 var roleIdentityResult = await userManager.AddToRoleAsync(identityUser, "User");
				 if (roleIdentityResult.Succeeded)
				 {
					  // Show success notification
					  return RedirectToAction("Register");
				 }
			}

			// Show error notification
			return View();
	  }

	  [HttpGet]
	  public IActionResult Login()
	  {
			return View();
	  }


	  [HttpPost]
	  public async Task<IActionResult> Login(LoginViewModel loginViewModel)
	  {

			// check if the input password is the same as the password in Db
          if (loginViewModel.UserName != null && loginViewModel.Password != null)
          {
              var signInResult = await signInManager.PasswordSignInAsync(
                  loginViewModel.UserName, loginViewModel.Password, false, false);


				if (signInResult != null && signInResult.Succeeded)
				{
					 // Show success notification
					 return RedirectToAction("Index", "Home");
				}
			}
			// Show error notification
			return View();
	  }

	  [HttpGet]
	  public async Task<IActionResult> Logout()
	  {
			// Applied Logout fuction from SignInManager
			await signInManager.SignOutAsync();
			return RedirectToAction("Index", "Home");
	  }
	}
}
- Create ViewModel and View Create ViewModels to create communication between View and Controllers. Login
 public class LoginViewModel
 {
	  public string UserName { get; set; }
	  public string Password { get; set; }
 }
Register
 public class RegisterViewModel
 {
	  // 3 info: user, email, password
	  public string UserName { get; set; }
	  public string Email { get; set; }
	  public string Password { get; set; }
 }
Login Page
@model MyBlog.Web.Models.ViewModels.LoginViewModel

<link rel="stylesheet" href="~/css/login.css" asp-append-version="true"/>
<script src="https://kit.fontawesome.com/122dcd2f11.js" crossorigin="anonymous"></script>

<section class="vh-100">
    <div class="container py-5 h-100">
        <div class="row d-flex align-items-center justify-content-center h-100">
            <div class="col-md-8 col-lg-7 col-xl-6">
                <img src="https://mdbcdn.b-cdn.net/img/Photos/new-templates/bootstrap-login-form/draw2.svg"
                     class="img-fluid" alt="Phone image">
            </div>

            <div class="col-md-7 col-lg-5 col-xl-5 offset-xl-1">
                <form method="post" class="justify-content-center">
                    <!-- Email input -->
                    <div class="form-outline mb-4">
                        <label class="form-label" for="form1Example13">User Name</label>
                        <input type="text" id="username" class="form-control" asp-for="UserName" />
                    </div>

                    <!-- Password input -->
                    <div class="form-outline mb-4">
                        <label class="form-label" for="form1Example23">Password</label>
                        <input type="password" id="password" class="form-control" asp-for="Password" />

                    </div>

                    <div class="d-flex justify-content-around align-items-center mb-4">
                        <!-- Checkbox -->
                        <div class="form-check">
                            <input class="form-check-input" type="checkbox" value="" id="form1Example3" checked />
                            <label class="form-check-label" for="form1Example3"> Remember me </label>
                        </div>
                        <a href="#!">Forgot password?</a>
                    </div>

                    <!-- Submit button -->
                    <div class="d-grid">
                        <button type="submit" class="btn btn-primary btn-lg btn-block"
                        asp-area=""
                        asp-controller="Account"
                        asp-action="Login">Login</button>
                    </div>

                    <div class="divider d-flex align-items-center my-4">
                        <p class="text-center fw-bold mx-3 mb-0 text-muted">OR</p>
                    </div>

                    <div class="d-flex flex-row align-items-center justify-content-lg-center">
                        <button type="button" class="btn btn-primary btn-floating mx-1 px-3">
                            <i class="fab fa-facebook-f"></i>
                        </button>

                        <button type="button" class="btn btn-primary btn-floating mx-1">
                            <i class="fab fa-twitter"></i>
                        </button>

                        <button type="button" class="btn btn-primary btn-floating mx-1">
                            <i class="fa-brands fa-github"></i>
                        </button>
                    </div>

                </form>
            </div>

        </div>
    </div>
Register Page
@model MyBlog.Web.Models.ViewModels.LoginViewModel

@{}

<link rel="stylesheet" href="~/css/login.css" asp-append-version="true"/>
<script src="https://kit.fontawesome.com/122dcd2f11.js" crossorigin="anonymous"></script>

<section class="vh-100">
    <div class="container py-5 h-100">
        <div class="row d-flex align-items-center justify-content-center h-100">
            <div class="col-md-8 col-lg-7 col-xl-6">
                <img src="https://mdbcdn.b-cdn.net/img/Photos/new-templates/bootstrap-login-form/draw2.svg"
                     class="img-fluid" alt="Phone image">
            </div>

            <div class="col-md-7 col-lg-5 col-xl-5 offset-xl-1">
                <form method="post" class="justify-content-center">
                    <!-- Email input -->
                    <div class="form-outline mb-4">
                        <label class="form-label" for="form1Example13">User Name</label>
                        <input type="text" id="username" class="form-control" asp-for="UserName" />
                    </div>

                    <!-- Password input -->
                    <div class="form-outline mb-4">
                        <label class="form-label" for="form1Example23">Password</label>
                        <input type="password" id="password" class="form-control" asp-for="Password" />

                    </div>

                    <div class="d-flex justify-content-around align-items-center mb-4">
                        <!-- Checkbox -->
                        <div class="form-check">
                            <input class="form-check-input" type="checkbox" value="" id="form1Example3" checked />
                            <label class="form-check-label" for="form1Example3"> Remember me </label>
                        </div>
                        <a href="#!">Forgot password?</a>
                    </div>

                    <!-- Submit button -->
                    <div class="d-grid">
                        <button type="submit" class="btn btn-primary btn-lg btn-block"
                        asp-area=""
                        asp-controller="Account"
                        asp-action="Login">Login</button>
                    </div>

                    <div class="divider d-flex align-items-center my-4">
                        <p class="text-center fw-bold mx-3 mb-0 text-muted">OR</p>
                    </div>

                    <div class="d-flex flex-row align-items-center justify-content-lg-center">
                        <button type="button" class="btn btn-primary btn-floating mx-1 px-3">
                            <i class="fab fa-facebook-f"></i>
                        </button>

                        <button type="button" class="btn btn-primary btn-floating mx-1">
                            <i class="fab fa-twitter"></i>
                        </button>

                        <button type="button" class="btn btn-primary btn-floating mx-1">
                            <i class="fa-brands fa-github"></i>
                        </button>
                    </div>

                </form>
            </div>

        </div>
    </div>
Authorization
The process of determining whether a user has access to a particular functionality.
- Allow user to access to some special pages or not
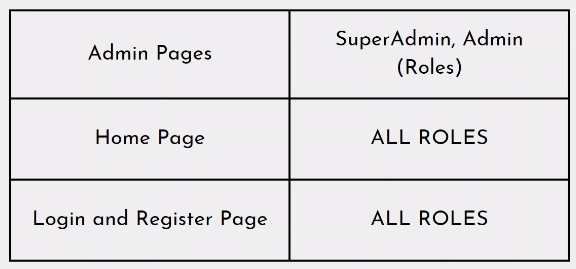
Add [Authorize] to limit the Action only to user with Admin Roles.
[Authorize (Roles = "Admin")]
[HttpGet]
public IActionResult Add()
{
	return View();
}
Add [Authorize] to limit the Controller (Controller’s Actions) only to user with Admin Roles.
[Authorize (Roles = "Admin")]
public class AdminTagsController : Controller {}

[Authorize(Roles = "Admin")]
public class AdminBlogPostsController : Controller {}
Inside AccountController add AccessDenied View to inform user who trying to login any Admin page without permission
[HttpGet]
public IActionResult AccessDenied()
{
	return View();
}
AccessDenied Page
<div class="container my-5">
    <h2> You not the Admin, Why are you Here? You Get... </h2>
    <img src="~/img/person-get-fuckin-deserve-love.png" class="d-block img-fluid mb-3" />
</div>
Redirect Admin User to AddTag Page (improve UX experience)
- First, add ReturnUrl property to LoginViewModel
- Second, Add a input to get user searched Url
<!-- ReturnUrl save the Url Admin trying access -->
<!-- for this Url: https://localhost:7210/AdminTags/Add
		 AdminTags/Add will be save to ReturnUrl -->
<input type="hidden" asp-for="ReturnUrl" />
Redirect User to ReturnUrl Page
[HttpGet]
public IActionResult Login(string ReturnUrl)
{
	// Create ReturnUrl to redirect user to the page they were trying to access
	// Ex: https://localhost:7210/AdminTags/Add -> /AdminTags/Add
	var model = new LoginViewModel
	{
		 ReturnUrl = ReturnUrl,
	};
	return View(model);
}

[HttpPost]
public async Task<IActionResult> Login(LoginViewModel loginViewModel)
{
  // check if the input password is the same as the password in Db
  if (loginViewModel.UserName != null && loginViewModel.Password != null)
  {
		var signInResult = await signInManager.PasswordSignInAsync(
			 loginViewModel.UserName, loginViewModel.Password, false, false);


		if (signInResult != null && signInResult.Succeeded)
		{
			 if (!string.IsNullOrWhiteSpace(loginViewModel.ReturnUrl))
			 {
				  return Redirect(loginViewModel.ReturnUrl);
			 }

			 // Show success notification
			 return RedirectToAction("Index", "Home");
		}
  }

  // Show error notification
  return View();
}
Authorize User’s Role

Potential Bugs and Notices
Potential Misalignments
- HTTP Method Mismatch: If the form’s
methodwasn’t set to “post”, the controller action wouldn’t be triggered due to the[HttpPost]requirement. The form must usemethod="post". Controller
// POST is used to send data to a server to create/update a resource.
[HttpPost]
//[ActionName("Add")] // if they're not the same Cs still recognized which Add to use (context: compare Add above and Add below)
public IActionResult AddTag(AddTagRequest addTagRequest) {}
View
<form method="post" action="/AdminTags/AddTag">
	<button type="submit" class="btn btn-dark">Add Tag</button>
</form>
- Action Name Change: If you refactored the controller method name and removed the
[ActionName]attribute, the form’s currentactionwouldn’t find a matching target. View Name = [ActionName] => AddTag = “Add” (which is the View Name)
  [HttpPost]
[ActionName("Add")] // if they're not the same Cs still recognized which Add to use (context: compare Add above and Add below)
public IActionResult AddTag(AddTagRequest addTagRequest)
{
	// Mapping AddTagRequest to Tag to domain model
	var tag = new Tag
	{
		 Name = addTagRequest.Name,
		 DisplayName = addTagRequest.DisplayName,
	};

	// get data from tag
	bloggieDbContext.Tags.Add(tag);
	// save changes
	bloggieDbContext.SaveChanges();

	return View("Add");
}
Because of the Form tag have
1. Input Fields
- HTML Structure: Yes, the
<input>,<label>, and other form elements reside structurally within the boundaries of the<form>tag in your HTML document.
2. Form Submission
Data Packaging: When a user submits the form, the browser collects data from the input fields specifically associated with that form. The key attributes here are:
- method: Defines how the data is sent (e.g., ‘post’, ‘get’)
- action: Specifies the URL (controller action) where the data is sent.
HTTP Request: The browser bundles the form’s data and sends it to the server as part of an HTTP request.
- ! This is not Alright at all
<div class="container d-flex justify-content-around pl-0">
	<div class="mb-3">
		<label class="form-label">Name</label>
		<input type="text" class="form-control" name="Name" />
	</div>

	<div class="mb-3">
		<label class="form-label">Display Name</label>
		<input type="text" class="form-control" name="DisplayName" />
	</div>

	<form method="post" action="/AdminTags/AddTag">
		<button type="submit" class="btn btn-dark">Add Tag</button>
	</form>

	<form method="post" action="/AdminTags/SubmitTag
		<button type="submit" class="btn btn-dark">Update Tag</button>
	</form>
</div>
- $ This is Alright
<div class="container d-flex justify-content-around pl-0">
  <form method="post" action="/AdminTags/AddTag">
		<div class="mb-3">
			 <label class="form-label">Name</label>
			 <input type="text" class="form-control" name="Name" />
		</div>
		<div class="mb-3">
			 <label class="form-label">Display Name</label>
			 <input type="text" class="form-control" name="DisplayName" />
		</div>
		<button type="submit" class="btn btn-dark">Add Tag</button>
  </form>

  <form method="post" action="/AdminTags/SubmitTag">
		<div class="mb-3">
			 <label class="form-label">Name</label>
			 <input type="text" class="form-control" name="Name" />
		</div>
		<div class="mb-3">
			 <label class="form-label">Display Name</label>
			 <input type="text" class="form-control" name="DisplayName" />
		</div>
		<button type="submit" class="btn btn-dark">Update Tag</button>
  </form>
</div>
Delete read only id = ‘00000000000000000000’
Id was missing inside the form
- ? To tell the server which blog post to delete, the ID needs to be sent within the body of the DELETE request. Forms provide a standard way to do this.
<div class="container py-5">
    @if (Model != null)
    {
        <form method="post">
            <div class="mb-3">
                <label class="form-label">
                    Id
                </label>
                <input type="text" class="form-control" id="Id" asp-for="Id" readonly/>
            </div>


            <div class="mb-3">
                <label class="form-label">
                    Heading
                </label>
                <input type="text" class="form-control" id="heading" asp-for="Heading" />
            </div>

				..a..lot..of..code..
	}
	 else{
        <div>No Model Exist !</div>
    }
<div class="container py-5">
- ? Id -> 00000000 bug solve (Cause: Delete Action get id from Add View Form. Not route id)
// Delete BlogPost by id
[HttpPost]
// Delete - remove tag from bloggieDbContext
public async Task<IActionResult> Delete(EditBlogPostRequest editBlogPostRequest)
{
	// use find for get existing tag
	// Talk to the repository
	var deletedBlogPost = await blogPostRepository.DeleteAsync(editBlogPostRequest.Id);
	if (deletedBlogPost != null)
	{
		 // Show success notification
		 return RedirectToAction("List");
	}
	// show fail notification
	TempData["ErrorMessage"] = "Failed to delete tag. Please try again.";

	return RedirectToAction("List", new { id = editBlogPostRequest.Id });
}
[HttpPost]
public async Task<IActionResult> UpdateHang(HangHoa hangHoa, int? Id)
{
	var httpClient = _httpClientFactory.CreateClient();
	Console.Write(hangHoa);
	// Serialize data appropriately for your API
	var content = new StringContent(JsonConvert.SerializeObject(hangHoa), Encoding.UTF8, "application/json");
	var response = await httpClient.PutAsync($"https://localhost:7116/api/Hang/UpdateHang{Id}", content);

	if (response.IsSuccessStatusCode)
	{
		 // Success! Redirect or display a success message
		 return RedirectToAction("Index");  // Example redirect
	}
	else
	{
		 // Handle the error
		 return View("Error"); // Example error handling
	}
}
![Let's make an Operating System [Part 1]](/images/os-dev/part-1/os_hu35bba049f1fb418e76027377d04a6f2f_494222_1110x0_resize_lanczos_3.png)